6.05.2013

Reduce Waste from Your Furry Friends, Too!

I wanted to share some tips about reducing the waste that comes from having pets. I'm only going to cover cats and dogs because that is what I have experience with. Meet Ravi (kit) and Jolene (pup).

Cats:
  • Buy refillable cat-litter. I know that Petco offers this. You buy a bucket full of litter. Then when it is empty you bring your bucket back, refill it, and they only charge you the refill price after the initial purchase.
  • Another green option is to use compostable cat-litter and compost your cat's waste. There are several options which include sawdust, commercially made pine or cedar litter, wheat-based, and litter made from recycled newspaper. You should use a separate compost bin for this, and it is not recommended to use this compost on plants you will eat, but you could use it on other non-edible plants in your yard. Here's an article on composting pet waste.
  • Check your local health food store for bulk cat food that you can put in your own container.
  • Make your own toys. We made a toy out of a dowel rod with strips of an old t-shirt tied onto it. Also, for some reason Ravi kept stealing my scrubber sponges made out of coconut fibers, so I attached a feather onto one for him. Lasers are pretty fun, too.
  • Make your own cat treats. There are lots of recipes on Pinterest. ;)

Dogs:
  • When out on walks, use paper or newspaper to pick up their "business" instead of plastic bags.
  • Again, research composting pet waste and if it would work for you.
  • Look for bulk dog food.
  • In the case of toys, Jolene, is very rough, I mean she shreds them. So I get heavy duty toys that will last a long time. I highly recommend the Kong line of toys; I put larger treats or peanut butter inside of these when we are leaving her alone for a while. Also, I recommend the Tuffy's Ultimate series toys; these are great for playing indoors because they are made of cloth. You can see in the picture she has torn this one up, but she has learned that if she doesn't destroy it she will get to keep it. It has lasted almost a year now. Both these brands of toys can be found at Petco. We also have a hard rubber toy, that we put smaller treats inside of, to keep her occupied.
  • Be careful when using a laser to play with your dog. Jolene becomes obsessed with trying to figure out where it is coming from and whines and goes completely insane for a while. Haha. She only gets to see it in small doses.
  • Make your own treats! Jolene loves these:

Sweet Peanut Butter Dog Biscuits


2 cups whole wheat flour
1 cup rolled oats
1/3 cup peanut butter
1 1/4 cup hot water
1 Tbsp. honey, molasses, maple syrup, or agave nectar
  1. Preaheat oven to 350° F.
  2. In a large bowl mix all dry ingredients.
  3. Add peanut butter and honey. Roughly mix then knead with your hands into a ball.
  4. Flour your counter and use a rolling pin to flatten the dough ball to 1/4 inch. 
  5. Use a cookie cutter to cut into the shape your want. -OR- Use a pizza cutter to cut into squares. -OR- Bake it as a whole sheet and break apart after it is cooked.
  6. Spray your cookie sheet with cooking spray and place your biscuits on the sheet.
  7. Bake for 20-30 minutes, depending on your pet's desired crunchiness. :)
  8. Allow to cool. Store in the refrigerator in an airtight jar. 
 I hope you have found this information helpful for your furry loved ones. Please share your pet waste reduction ideas!

love & light,
Claire

5.11.2013

Making "That Time of the Month" Eco-Friendly and Body-Friendly

Men beware - this one is just for the ladies, unless you would like to hear about "that time of the month". :)

Okay, now that I've made that disclaimer, today I'm going to discuss menstrual cups. A few months ago I switched from tampons to a Lunette Cup, and I absolutely love it. It's so great because, my "lady time" seems to be shorter, I save a lot of money not having to buy tampons,I don't have to rush to the nearest gas stations when I forgot to get them, there is no waste (applicators and wrappers), it is non-toxic, you can wear them all day, and I don't even feel like I am on my "lady time" when I use it. I hope to help other women realize the convenience, health, and environmental benefits of these wonderful tools.
I believe there is a taboo about menstrual cups because the average woman is taught that their cycle is a dirty, smelly, gross, embarrassing, and disgusting time; and that the disposable, one-time use convenience of scented tampons is the best and easiest way to deal with it. Thanks to large corporations and those pesky commercials tampons have always seemed to be the only option, when in fact menstrual cups have been around just as long as tampons. Knowledge of the cups is spreading by word of mouth and gaining popularity; in the past few years we have gone from having four cup companies to at least twelve. Women should embrace the fact that "lady time" is part of who we are and what makes us the goddesses we are, what makes us WOMAN! Accepting the fact that IT HAPPENS for every woman, is a great step towards women feeling comfortable in their bodies. We don't have to be afraid of being close with the way our cycle works. The cup allows you to become more familiar with the duration and flow of your "lady time".  Once you realize how bad those disposable, bleached, trash producing tampons are for your body and the environment, the cup seems like a no-brainer.

Why tampons are bad:
  • Women use up to 15,000 tampon in their lifetime. There are nearly 4,000,000,000 women on this planet. Think about all of those plastic applicators and wrappers.
  • Tampons are chlorine-bleached to get them super white, which can cause Toxic Shock Syndrome (TSS).
  • Many tampons can contain Dioxin which is known to cause cancer, endometriosis, damaged nervous system, pelvic inflammatory disease, and reduced fertility. - Especially with repeated contact. - Does wearing 3-5 tampons, 3-7 days a month for 40 years count as repeated contact?
  • They can tear your vaginal lining when being removed.
  • They leak.
  • You have to change them 3-5 times a day.

Why cups are good:
  • They are reusable!
  • The Keeper brand is made from natural rubber, so it is biodegradable. (My next one will be a Keeper.) The others are made of medical grade silicone, which is incredibly durable, hypo-allergenic, does not absorb anything including bacteria or your natural moisture. So no worries about it tearing your vaginal lining.
  • They come in many different sizes, so you can find one to meet your needs.
  • Lasts up to 10 years! The average cost, $30, over 10 years is only 30 cents per month. Buying tampons, not including pads or liners, over a course of 10 years would cost nearly $500.
  • You usually can wear them all day, unless you have a very heavy flow. Which means you can wait until you are in the comforts of your own home before you have to deal with it. I only have to empty mine once a day before bed, but it is different for everyone.
  • Once you learn how fast yours fills up, you don't ever have to worry about leakage. You also know how long you have before you have to empty it.
  • No risk of TSS.
  • You don't have to worry about finding places to buy tampons while traveling.
  • You can wear it when you think your "lady time" is about to start so you don't have to mess with it in some inopportune moment.
  • You can't feel it.

Some help for those already using cups or wanting to try:
  • Practice putting it in and taking it out a couple of times before you are actually on "lady time".
  • Folding it and inserting upward and back slightly is the easiest way. Here are 2 methods of folding:
  • Once it is in, feel around the sides of the cup to make sure it is open completely, then you know the seal is made and there will be no leaking. :)
  • To remove, pull the tab and sort of push with your stomach. Once it is pulled down far enough, pinch the bottom of the cup to release the seal, then you should be able to pull it out keeping it upright so you don't spill. Then you can dump it out.
  • You can cut the tab on the cup to your liking, but I'd wait to make sure it doesn't move up in your vaginal canal after you have been wearing it for a while. If it is a flat tab, cut it in a U shape instead of straight across.
  • To clean initially and between "lady times" you should boil your cup for the time recommended by your cup manufacturer. Here's a good idea ------------------------>
  • To clean during "lady time" you can just use a mild unscented soap and cold water, cold water does not cause staining. Or if you are in a hurry, you can wipe it with toilet paper.
  • There are some disposable/one-time-use cups available. Of course, I don't like the idea of them because they are disposable. They also seem to be more difficult to maneuver into place because they are bigger around, and are made out of thin plastic so they would be more prone to leakage without the proper seal. (It is the bigger one with the pink ring in the photo above.)

These websites are really informative if you need more help:

Another thing I'd like to mention is washable, reusable, cloth pads and liners. There are many available for sale on Etsy, or there are lots of tutorials and patterns online if you want to sew your own. I have found I don't even have to use these though because the cup works so well! :)

These are from sewfussy on Etsy.
Ooo, and I wanted to mention I love chamomile tea for cramps. I like to hold the warm cup on my belly, too.

Please share your thoughts!!

love & light,
Claire

5.03.2013

Earthwise in the Bathroom

When I decided to start reducing and cleaning out rooms in the house, I realized that a lot of household waste came from the bathroom. I got rid of all the unnecessary stuff and started looking for other options. Here are some alternatives I've found to reduce waste and eliminate disposables:

Toilet Paper - Try to buy rolls individually wrapped in paper, or larger packages with recyclable plastic wrappers. I've found Walgreen's Ology brand toilet paper to be great! It's made from sugar cane husks and bamboo, TREE FREE! WOO!

Body Wash - Make your own and put it in a reused spray bottle. See my recipe here. Or just use straight castile soap.

Shampoo & Conditioner - Try the "no-poo" method: wash your scalp with baking soda, then rinse with vinegar for conditioner and shine. With my long hair, I didn't have the patience to get through the transition period where your hair is more oily for a while. I've read lots of testimonials and some people love it, and I believe it's easier with short hair. I want to try it again, but for now I buy shampoo & conditioner in bulk, in reused containers.

Shaving Cream- Most of the time, I'm lazy and just use the body wash. I've made some shaving cream, and I liked it, because sometimes I just crave a good lather. I'll share the recipe soon.

Razors- Switch to a reusable old fashioned safety razor. I got mine in perfect condition on Ebay, and it's from 1963! That says a lot for it's durability and quality. If you take out the razor blade and dry it between each use, it should last about 2 months. Which means a pack of 10 blades could last you 5 years!

Deodorant-  I've been making my own with a combination of baking soda, coconut oil, and arrowroot powder in a reused glass container. I haven't gotten the consistency perfect yet, so I'm waiting to share.

Toothpaste- Try your making your own. Here's mine. Or if you don't like dipping into the jar, you can make a powder to sprinkle onto your toothbrush with baking soda and stevia.

Toothbrush- I haven't found any amazing alternatives yet, but I have high hopes for the Bogobrush and The Environmental Toothbrush.

Floss- Try a reusable gum stimulator or biodegradable silk floss.

Hairspray- I very rarely use it, but when I do I'm going to try strained lemon water with a splash of vodka, in a spray bottle of course. ;)

Cotton Swabs- Avoid using them altogether, but if you can't, try to find some that have paper tubes/sticks and a cardboard container (no plastic.) I found some at Family Dollar in a cute decorative box.

Feminine Products- Switch to a menstrual cup and/or reusable(washable) pads. The Diva Cup is the most popular, but there are many other brands out there. Don't freak out yet, I won't go into any more detail right now, but I plan to do a separate post about it. I swear you won't go back if you try it.

Make-Up-  Reduce what you use. I only use mascara, brow liner, and Burt's Bees Lip Balm. I want to try making my own version of all of these. This would be awesome to try; maybe I can do a product review.

Face Wash- Rinse your face, rub gently with honey (avoiding eyes and hair), let sit for 30 seconds if you wish, then rinse. That's it. Honey is anti-bacterial, anti-fungal, moisturizing.

Plastic Band-Aids- Instead, use gauze and paper surgical tape. You can cut the gauze to the size you need.

Antibiotic- Avoid drugstore antibiotic ointments. They usually contain Triclosan, which can cause bad bacteria to become stronger. Try using honey, 100% tea tree oil, or thieves oil.

Bathroom Cleaning:
  • Baking soda for scrubbing
  • Vinegar for disinfecting
  • A mixture of both baking soda and vinegar for cleaning the toilet and drains
  • Microfiber cloths for mirrors.
  • 2 or 3 drops of eucalyptus or peppermint oil in the toilet to keep it fresh

Water Conservation:
  • Put a brick in your toilet tank to reduce the amount of water used to fill it up
  • Collect water in a bucket while your shower heats up, then use the water for plants
  • Install a shower head that puts out less water
  • Install a shower head with a shut off valve for the in-between times when you step out of the water such as lathering hair, shaving legs, etc.
  • Don't run the water while you are brushing your teeth
  • I'll say it again, "If it's yellow, let it mellow."


I hope you have found these tips helpful. Please share any changes you have made!!


love & light,
Claire

4.27.2013

Earthwise Laundry

Laundry is a big part of our weekly household chores. It is great to not have to buy laundry soap and dryer sheets anymore because I make my own, and I'm going to share my ways with you!

Many conventional laundry detergents, fabric softeners, and dryer sheets contain volatile organic compounds (especially the scented ones), several of which are considered as hazardous air pollutants. These can be even worse if they become trapped inside your home. Read more about that here. That is part of the reason I started making mine, and because I think it is satisfying to know what goes into it.

Here are my recipes for laundry soap and fabric softener/dryer sheet soak:

Liquid Laundry Soap Recipe

3 Tbsp. Washing Soda
3 Tbsp. Baking Soda
3 Tbsp. Castile Soap
Hot Water
Laundry Soap Container

Mix all the ingredients into the laundry soap container, then fill the rest of the way with hot water. Gently shake to mix. Gently shake before each use, but avoid splashing it into the lid section before opening.

This laundry soap is thinner than the store bought stuff, so you might want to use more for each load, but that's okay because it is so cheap and easy to make!

Fabric Softener Recipe

3 cups water
1 & 1/2 cups white vinegar
1 cup hair conditioner (any scent you want, the stronger smelling the better!)

Mix all these ingredients together into a container of your choosing. Gently stir, do not shake.

To use in the rinse cycle just use the same amount you would with the store bought stuff.

**I like to soak a small towel or wash cloth in the jar, then wring it back out into the jar. Let it air dry, then toss it in the dryer like a dryer sheet! I use it 4-6 times between soakings.

*Note* - In the future, I would like to avoid buying a small plastic bottle of conditioner for making this recipe, I will probably buy conditioner in bulk in my own container, or find a substitute for it altogether. I will keep you updated! First, I have to use up this huge bulk bottle I found under the sink at our house when we moved in. :)

Some tips for conserving water:
  • Set the washer load size accordingly for each use, and use a shorter cycle unless otherwise necessary.
  • Wait until you have a full load to do your laundry.
  • Look into saving your grey water to water plants outdoors.
  • Make sure there are no leaks.
  • When it is time to get a new washer, try to find an Energy Star-approved machine. According to Energy Star, they use 50% less water than less efficient models.
Tips for conserving energy:
  • Wash with cold water, about 90% of the energy consumed during laundry is used just to heat up the water.
  • Use a clothesline to dry your clothes, or you can even hang them indoors.
  • Make sure to clean your lint trap well, this also helps avoid fire hazard.
  • Make sure your ventilation tube is clear.
  • Throw a clean, dry towel and a tennis ball into the dryer. The towel helps absorb moisture and dry faster, while the tennis ball helps the air move between clothes easier.
  • Buy an Energy Star-approved washer, which uses 30% less energy.
  • Energy Star does not approve dryers because they all use about the same amount of energy, but they do suggest buying a dryer with a moisture sensor that automatically shuts off when the load is dry.

Please feel free to share any more handy hints for the laundry room that you may have!

love & light,
Claire

3.23.2013

Natural Antibacterial Body Wash Recipe

I developed this body wash by combining aspects of other recipes that I liked. This is more liquidy than the body wash you would buy at the store, so I use a spray bottle to be less wasteful. It's kind of fun because it is so different than any other way you would use soap in the shower. My boyfriend says he really likes using the spray bottle!

The castile soap is a great natural soap base, and aloe vera and coconut oil are awesome moisturizers. Eucalyptus, tea tree, and lavender are all antibacterial oils. I use the glycerin is to help preserve the concoction, but also acts as a moisturizer!

Ok, here you go!

Earthwise Natural Antibacterial Body Wash Recipe


1 cup castile soap (your choice of scent) (I used Dr. Bronner's Lavender)
1/4 cup aloe vera juice
1 tsp. vegetable glycerin
10 drops eucalyptus oil
10 drops tea tree oil
5 drops lavender (I just like to add more lavender ;) )
1 Tbsp. coconut oil, melted
Spray Bottle
Funnel

Mix together everything except the coconut oil. Melt the coconut oil to a liquid, whichever method you like, it doesn't take much to melt it. Then mix it in quickly, so it doesn't re-solidify. Then use a funnel to put it in your spray bottle!

If you want to make more at a time, just double the batch!

I hope you will try it out and let me know what you think!

love & light,
Claire

2.27.2013

Starting Seeds Indoors - The Earthwise Way

So, it's time to start growing seeds!! I love dreaming of what I will grow and drawing plot diagrams all winter, and now I get to start something! I usually begin by looking at what Baker Creek Heirloom Seeds has to offer, as well as Seed Savers Exchange, and Totally Tomatoes...because tomatoes are my favorite. I make an order for the special seeds I want to try, and get the rest of my seeds at a local hardware store.

You will also want to research the best times to start your seeds for your area. A great resource is "The Old Farmer's Almanac"--you just enter in your location and it gives you the best planting dates and the best moon-favorable dates. Also, Mother Earth News has What to Plant Now by region.

I wanted to try growing seeds in reused and/or biodegradable containers this year. So I have been collecting toilet paper tubes, egg cartons, and plastic food containers. I am also going to use compost instead of potting soil. This should reduce the need for fertilizing.

Today I am starting broccoli, spinach, lettuce, kale, onion bulbs, parsley, sage, thyme, and some flowers I want to try. Later in March, in addition to more of the previous, I will start some peppers, tomatoes, eggplant, chard, cauliflower, basil, cilantro, and dill.


Supplies:
  • Containers/pots - toilet paper tubes(see tutorial), egg cartons, plastic food containers (all need to have drainage holes in the bottom)
  • Leak-proof tray to put under containers
  • Something to label your seeds (popsicle sticks, shaved sticks, painted pebbles...etc.)
  • Sifted compost or another seed starting medium
  • Transparent cover to keep in humidity and still let in light (reuse and cut plastic bottles, plastic food container lids, plastic bags, large jars, bell jars, etc.)
  • Spray bottle
Steps:
  1. Punch holes in the bottom of your containers.
  2. Place containers in a leak-proof tray or larger container.
  3. Fill containers with compost or seed starting medium.
  4. Wet the planting medium.
  5. Sew seeds according to seed packet directions.
  6. Cover with transparent cover.
  7. Set in a warm sunny spot.
  8. Keep moist with spray bottle (or water from the bottom) and wait for sprouts!


If the condensation inside the cover is forming droplets, there is too much moisture. Just take it off for a couple hours to let it air out.

Something else you should consider is the lighting for your seeds. As soon as the seeds have leaves they are ready to soak up the sun. If your house is like mine, where the light diminishes as the surrounding trees begin to leaf out in the spring, you may need to supplement lighting. Ideally, I would have a fluorescent light with one warm and and one cool spectrum bulb, but for now I have a regular bulb-sized "plant light." I use a timer so the light comes on and goes off at certain times,making sure the plants get a full 8 hours of light. If the area where you will have your seeds is on the cooler side, you may want a waterproof heating pad to put under your containers to keep your seeds nice and cozy.


Once the seedlings are tall enough to touch the transparent cover, you can remove it. Make sure to continue to keep the roots of the plants moist.

When you are ready to move the seeds to your garden you will need to "harden them off," or get them used to the weather outside first. Take your seedlings and set them outside for a couple of hours everyday, increasing their time outside each day. If the leaves start turning white, they are getting too much sun at the time and need to be brought in immediately. Seedlings take time to adapt to the sunlight. Once they have fully adapted they can be transplanted.

Lastly, I will talk about fertilizing. Typically, you can start fertilizing seeds when they develop their first "true leaves." Those two initial oval shaped leaf things that most seedlings have aren't actually leaves. They are called cotyledons, which are part of the seed embryo. They provide food to the seedling until it develops its true leaves and can perform photosynthesis. Wait for the seed's true leaves before fertilizing.

Fertilizer Options:
  • Synthetic Fertilizer should be diluted to half the amount recommended on the label. You could probably get away with 1/4. Feed weekly.
  • Organic fertilizers come in liquid form, granular, fish emulsion, kelp, and worm castings. Feed weekly to bi-weekly. (I plan to use a mixture of kelp and worm castings if necessary).
I know this is a lot of information, so please let me know if you have any questions. I would love to help you! Happy growing!!!

love & light,
Claire

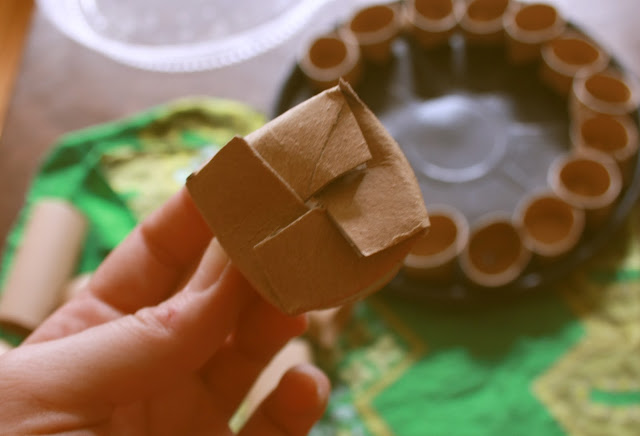
Biodegradable Seed Starter Pots From Toilet Paper Rolls

I am getting ready to do a post on starting seeds so I thought this tutorial would be helpful first!

 1. Start by collecting your toilet paper rolls.

 2. Flatten the roll, and cut it in half.

 3. Then cut four slits at one end of each piece.

4. Fold the four flaps you have created inward. If there is a hole it is okay, it will be good for drainage. :)

5. Now you are ready to fill your little pots and start seeds!

love & light,
Claire